3D retinoscope simulator: learn the instrument, then examine a 3D patient
A complete, free path from holding a streak retinoscope for the first time to reading the reflex: explore every part in 3D, follow the light through the head, rotate the streak, and then aim it at a patient's pupil at a real working distance.
Open the 3D retinoscope Start patient training Full retinoscopy simulator
Quick answer
Pupilla's 3D retinoscope is a free browser model of an educational streak retinoscope. In five modes you can explore its 11 parts, cut the head open, explode the assembly, study the outgoing light and rotate the streak through 360°, and train on a 3D patient eye where the reflex — with motion, against motion or neutrality — is computed by the same optics engine as the retinoscopy simulator. It runs on computers, tablets and phones, with touch controls, in English and Arabic.
At a glance
| Item | Detail |
|---|---|
| Parts you can select | 11 — 8 external and mechanical parts plus 3 internal optical components, labelled as conceptual |
| Study modes | 5 — Explore, Section, Exploded, Light path, Patient |
| Streak rotation | Continuous 360° ring rotation, by dragging the ring or with a slider |
| Patient working distance | 35–100 cm, with 50 cm and 67 cm neutrality checked |
| Patient pupil | 2–8 mm |
| Reflex engine | The same optics core as the retinoscopy simulator |
| Devices | Computer, tablet and phone; mouse, touch and sliders |
| Language and cost | English and Arabic; free, no account |
Five ways to learn the retinoscope
- Explore — Rotate and zoom the assembled instrument. Select any part to see its name and job, focus on it, isolate it, recolour it, fade it or move and rotate it — every change can be reset.
- Section — Open the housing to see inside the head: the light source and streak former, the focusing optics and the steering reflector, each clearly marked as a conceptual teaching component.
- Exploded — Separate the head, handle, sleeve and optics in their assembly order, then reassemble with one control.
- Light path — Follow the outgoing illumination to a screen, rotate the streak through 360° by dragging the ring, and compare divergent, parallel and convergent beams.
- Patient — Reassemble the instrument, face a 3D patient eye, set working distance and pupil size, aim the light at the pupil and sweep the streak to read the reflex.
Parts of a streak retinoscope
Every part below can be selected in the 3D model. Components marked "conceptual" explain how the optics work; they are not a manufacturer's internal design.
| Part | What it does |
|---|---|
| Optical housing | The protective head holds the illumination and viewing paths in alignment. Open the section to explore its interior. |
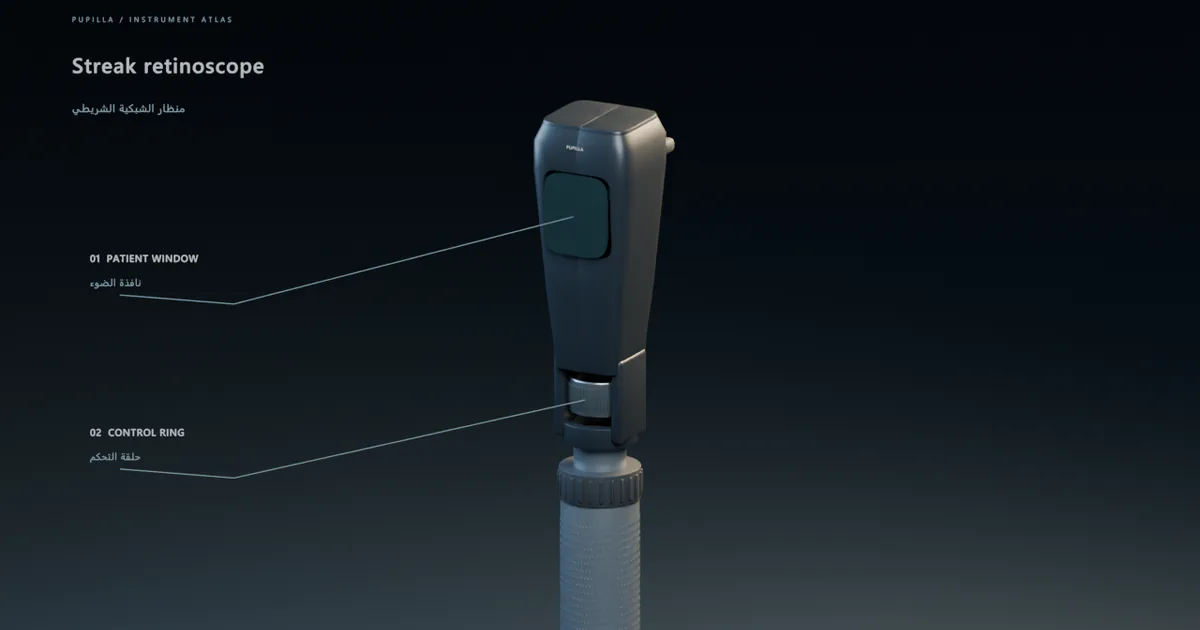
| Patient window | Outgoing light passes through this patient-facing window. It is distinct from the small viewing aperture on the examiner side. |
| Viewing aperture & brow rest | Look through the small rear opening to observe light returning from the pupil. The brow rest helps position the instrument. |
| Focus & rotation ring | Rotate the ring to change the streak orientation. Slide it to adjust the instrument optics. The travel shown here is illustrative; beam presets are independent. |
| ParaStop | On the referenced HEINE instrument this limits sleeve travel at the parallel-beam setting. It does not replace the mirror. Its exact stop position is not calibrated in this model. |
| Power handle & connector | The handle supplies power to the head. The upper control adjusts illumination. The grip and connector are represented as separate manufactured parts. |
| Power cell (conceptual) | A conceptual power cell inside the handle. Its shape and contacts explain the power assembly; they are not a manufacturer battery specification. |
| Battery cap | The lower cap closes the power handle. Exploded view separates it to make the assembly understandable. |
| Light source & streak former (conceptual) | A conceptual LED and streak-forming assembly. Amber indicates outgoing illumination. The internal layout is educational, not a manufacturer teardown. |
| Focusing optics (conceptual) | These conceptual optics explain beam focus and vergence. The lens prescription and exact mechanical linkage are not established by the public manuals. |
| Steering reflector (conceptual) | A conceptual reflector directs illumination toward the patient while the central opening keeps the observation path clear. Exact construction is illustrative. |
Patient training: from aiming to neutrality
- Open patient mode. The instrument reassembles and a 3D eye faces you.
- Choose the patient’s spherical refractive error, then set the working distance (35–100 cm) and the pupil size (2–8 mm). Working distance is measured from the light exit to the corneal apex.
- Aim: move the instrument until the light falls on the pupil — the feedback tells you when you are on target.
- Sweep the streak across the pupil and watch the reflex. Moving the same way as the streak is with motion; the opposite way is against motion.
- Add trial lens power until the pupil fills with light — neutrality — then subtract the working-distance lens (+1.50 D at 67 cm, +2.00 D at 50 cm).
- Switch to the examiner view to look through the aperture; the narrow view is labelled as magnified.
One learning path, three tools
- 1 · Know the instrument — The 3D retinoscope: parts, controls, light path and streak rotation.
- 2 · Train on a patient — Patient mode: aiming, working distance, sweep, with/against motion and neutrality on spherical errors.
- 3 · Complete the refraction — The retinoscopy simulator: astigmatism, principal meridians, sphere, cylinder and axis, with practice cases and feedback.
- 4 · Understand the theory — The streak retinoscopy guide and the refractive errors guide.
What is modelled — and what is not
- The instrument is a Pupilla educational streak retinoscope referenced to published HEINE documentation, not an exact replica of any manufacturer's device.
- Internal optics are conceptual teaching components; sleeve travel is illustrative and is not calibrated to beam vergence.
- In patient mode the reflex is a teaching overlay inside the pupil, driven by the clinical optics engine — not a ray-traced or photometrically calibrated fundus reflex.
- Patient mode covers spherical errors with trial spheres in plane-mirror mode and relaxed accommodation. Astigmatism is practised in the full retinoscopy simulator.
- Simulation complements, and does not replace, supervised practice with a real retinoscope.
Frequently asked questions
What is a streak retinoscope?
A streak retinoscope is a hand-held instrument that projects a line (streak) of light into the eye so the examiner can watch the light reflected back through the pupil and measure the refractive error objectively. It is the main tool of retinoscopy, used for glasses prescriptions in adults and children.
What are the parts of a retinoscope?
A streak retinoscope has a head with a patient window where light exits, a small viewing aperture and brow rest for the examiner, a sleeve or ring that rotates the streak and changes the beam, a light source and internal optics, and a power handle with a battery. You can select each one in the 3D retinoscope.
What does the retinoscope sleeve do?
Rotating the sleeve turns the streak so you can scan different meridians of the eye; sliding it changes the beam between divergent (plane-mirror effect) and convergent (concave-mirror effect). Most retinoscopy is done in the plane-mirror position.
What is with and against motion in retinoscopy?
With motion means the reflex in the pupil moves the same way as the streak and you add plus lenses; against motion means it moves the opposite way and you add minus lenses. At neutrality the pupil fills with light. Practise it in patient mode.
Why do you subtract the working distance in retinoscopy?
At neutrality the eye is focused at your working distance, not at infinity, so you subtract the dioptric value of that distance: +1.50 D at 67 cm or +2.00 D at 50 cm. Forgetting it is the most common retinoscopy error.
Is there a free 3D retinoscope simulator?
Yes. Pupilla's 3D retinoscope is free in any modern browser with no account, in English and Arabic, and connects to a full retinoscopy simulator for astigmatism.
Instrument and clinical sources
- HEINE · Instructions for use — Controls, 360° rotation, ParaStop and approximate 25 cm focus.
- HEINE · Product data sheet — Published envelope and nominal 35 × 1.1 mm streak at 500 mm.
- AAO EyeWiki · Retinoscopy — Clinical principles, reflex interpretation and working distance.
References & further learning
Sources for the teaching principles. Listing a source does not imply its institution endorses or validates this simulator.
For education and training only. Pupilla is not a medical device and must not be used for diagnosis or treatment decisions.